Wednesday 30 September 2015

Frostgrave Scenery Project 05

Part 01, Part 02, Part 03, Part 04

With the rubble pile finally set (the grout and PVA took a while to go off), I have given the base and rubble a coating of sand.


I spread PVA glue evenly over the base, but added it in a much more patchy way over the rubble, hiding most of the grout but leaving patches of the polystyrene exposed.


The exposed polystyrene will be painted up as stone.


I added some sand to a few other places on the model too. To help give the aged, ruined effect it breaks up the even surfaces nicely. It also hides seems and joints quite well.


In this photo you can see the wrecked door of the tower. I made this with a piece of balsa wood that I scored planking lines into and then cut away pieces at each end to show where the wood has rotted!


In the final photo you can see where I have marked the boundary between the inside of the buildings and the outside. The sand stops on the door step. I should probably have raised the floor height above ground level a little and added a door step. I will remember to do this with the next ruin I do...


Saturday 26 September 2015

Star Trek Attack Wing Terrain Making

While we prepare for our Fostgrave campaign we have been playing Star Trek: Attack Wing. It makes a good filler between bigger games and then pre-painted models make it even easier to get up and running.
However, I still needed some terrain for the game. Firstly I wanted a gaming mat to play on. I spent some time searching around the internet for a suitable space photo and found plenty of really high quality photos that would give good definition on large scale print. I  had the photo printed out an 3 feet square as this gives a good playing area and also just fits on our dining table. Once printed I had the whole thing laminated with a matt finish. This really makes the image stand out and, of course, protects it from damage.

I am really pleased with the results and we have used the matt quite few times now!


 I felt that the flat planet templates that are supplied with the game left a bit to be desired so I bought a large Christmas decoration ball on Ebay and have painted it up to be our planet.


I had to cut off the hanging tab which was simple enough, with a piercing saw.


 Then I painted the inside of the two halves of the sphere with swirling blue, silver and gold patterns.


Once the two halves are together I am very happy with the results and I think it achieves suitably Star Trek like planet look!


The final part of this build was to mount the planet on a clear acrylic ring, to stop it rolling around the table. Just as an after thought, it has been pointed out that I could have used the two haves of the clear ball as two separate planets. This might have been nice, as I could have painted them a different colour!


I wanted to add a few asteroids to my deep space hazards too. So I bought a bag of various sized polystyrene balls. Rather than spend any time carving them into irregular shapes I simply sprayed them with several very heavy coats of grey primer. The paint ate into the polystyrene and gave quite a nice random shape. I think if I do any more I will carve into the balls a little before spraying them, but otherwise I am happy with the results.


 I have also had half a dozen other asteroids given to me, I have a quite a good collection of terrain for my space battles now.


Friday 25 September 2015

Frostgrave Scenery Project 04

Part 01, Part 02, Part 03

 I am aiming for reasonably detailed  but playable, rather than highly detailed diorama quality. So with that in mind I have left the timber detailing and moved on to building the rubble piles around the ruined parts of the buildings.

For most of the bulk of the rubble I have used roughly cut chunks of blue insulation foam (styrofoam). I hacked them up very roughly and in some cases just broke pieces apart, as this gave a nice rubble like effect.


I used a PVA based woodglue to stick the chunks of styrofoam down, and slowly built up the piles. Once the glue had set I used some grey tiling grout to fill in gaps and give a more cohesive look to the piles.


 I added one or two bits to the upper floors of the tower, although I didn't want to limit the floor space too much, as it is important that there is enough space for the figures to be placed.


On the subject of placing figures, the rubble piles are laid out in a purely representative way. If the these buildings had really collapsed there would be a lot more rubble and placing figures would be a lot more difficult. This is a compromise that should means the model looks good but is still usable on the gaming table.


While I have the grout out I used it to fill some of the joins where there were unsightly gaps.


Once again I have not been too neat with the grout as the ruined buildings will need quite a rough finish anyway.


While taking these photos I have noticed that there is one (damaged) window that I have missed adding a timber frame to. So that will be my next job. Then I will be adding some sand to the model.

Wednesday 23 September 2015

Frostgrave Scenery Project 03

Part 01, Part 02

 Added a little more timber detail to the Wizard's Tower.

Beams underneath the floors...


Some detailing around the doors. I also finished of the stairs to the main front door, hiding the sides of the foam core steps...


Some simple framing for the windows, which tidies them up nicely.


I finished off the roof structure. I will be adding a few loose tiles to this later on...


I didn't want them to look to perfect so this door frame has decayed over the centuries...


I don't want to spend too long on the detailing as this is supposed to be a fast project. So I will be moving on to adding some rubble and masonry work next time.

Friday 11 September 2015

Frostgrave Scenery Project 02

Following on from Part 01.

In my previous post I built the main structure of the the Wizards Tower. This time I am starting to add a little detail.


I have used some spruce strips, they are stronger and more durable than balsawood, however balsa would be a good alternative. I will need several ladders, and these can be tricky to make. I used two square section spruce strips for the sides and then cut the rungs from thin bamboo strips that I got from an old bamboo window blind.


The roof is not finished yet, I have more strips to add and then some tiles to add on top of that.


I used flat spruce strips for the floor of the bridge, and then built up the sides and supports.


I have also added some spruce joists to the underside of the floors in the tower.


I wanted to have some damage to the bridge, however it is quite high on the model and I didn't want figures falling off and ruining their paintwork so the simplest thing was to only have a small break in the hand rail!

The other side of the tower, I wanted to have a different style of bridge. This one will be a stone arched bridge.


I have used 5mm foam core for this.


Next time, I will be adding a more detailing and starting to disguise some of the card and foam core...

Tuesday 8 September 2015

Playing with a CNC Milling Machine

We have had a small CNC Milling machine in the workshop for a couple of years and have used it for the occasional job (with mixed success). However, we have ad some time to play with it this summer and are improving our experience with it.

I do not have enough knowledge of 3D design to have designed this job, I downloaded it from Thingiverse.

I have run the file several time, either in styrofoam or Model board.

The first one was done in styrofoam and cut quite quickly (under 2 hours). The detail is low, but it will make a good weathered stone statue.


After the foam model I wanted to up the quality so I decided to use model board (a dense polyurethane foam board). I also used a very small pointed cutter and set the layer height to .3mm.
The job took eight and a half hours, but the detail is far more impressive. This video, taken at several points during the cut, shows how slow the process was...


 This if the finished piece.


Next I plan to try a hard wood version with a small ball nose cutter...

Saturday 5 September 2015

Frostgrave Scenery Project 01

As I stated in my last post, over the next couple of months I am going to be building up a series of terrain pieces to use in our Frostgrave campaign.  I started by going through the rulebook and listing all the specific piece that are used in the scenarios, which are as follows:-

Square Mausoleum Building, 6" per side with a door in each wall.

Ruined Wizards Tower - at least 10" high with three floors. This tower must have a building either side of it with a bridge or ladder allowing access to the upper storeys.

Underground Library- The table must be covered in multiple decaying book shelves and rubble. There should be a door or entrance point on each of the four sides of the table.

6 Statues in a 12" square ruin.

Haunted Houses - Six small stone monks huts with no roof!

A Well or Fountain

Four 2" diameter discs to act as teleport points..

6 Columns or ruined columns.

On top of these specific pieces we will need a selection of generic ruins.

The only one that I have decided to avoid is the Underground Library as I think the work needed in making a mass of book shelves to fill the table, would have limited re-usability, as it could only be used for the one scenario. The rest will hopefully be usable for other fantasy games as well as possibly historical one too.

Thee four discs for teleportation points should be easy enough and even if I can't use them too much, I am sure they can be used as objective markers in future games.

So, first up I have decided to go with the Ruined Wizards Tower.

As this piece has to have a tower and a ruined house at either side of it I used one of the 40x20cm bases that I had made.
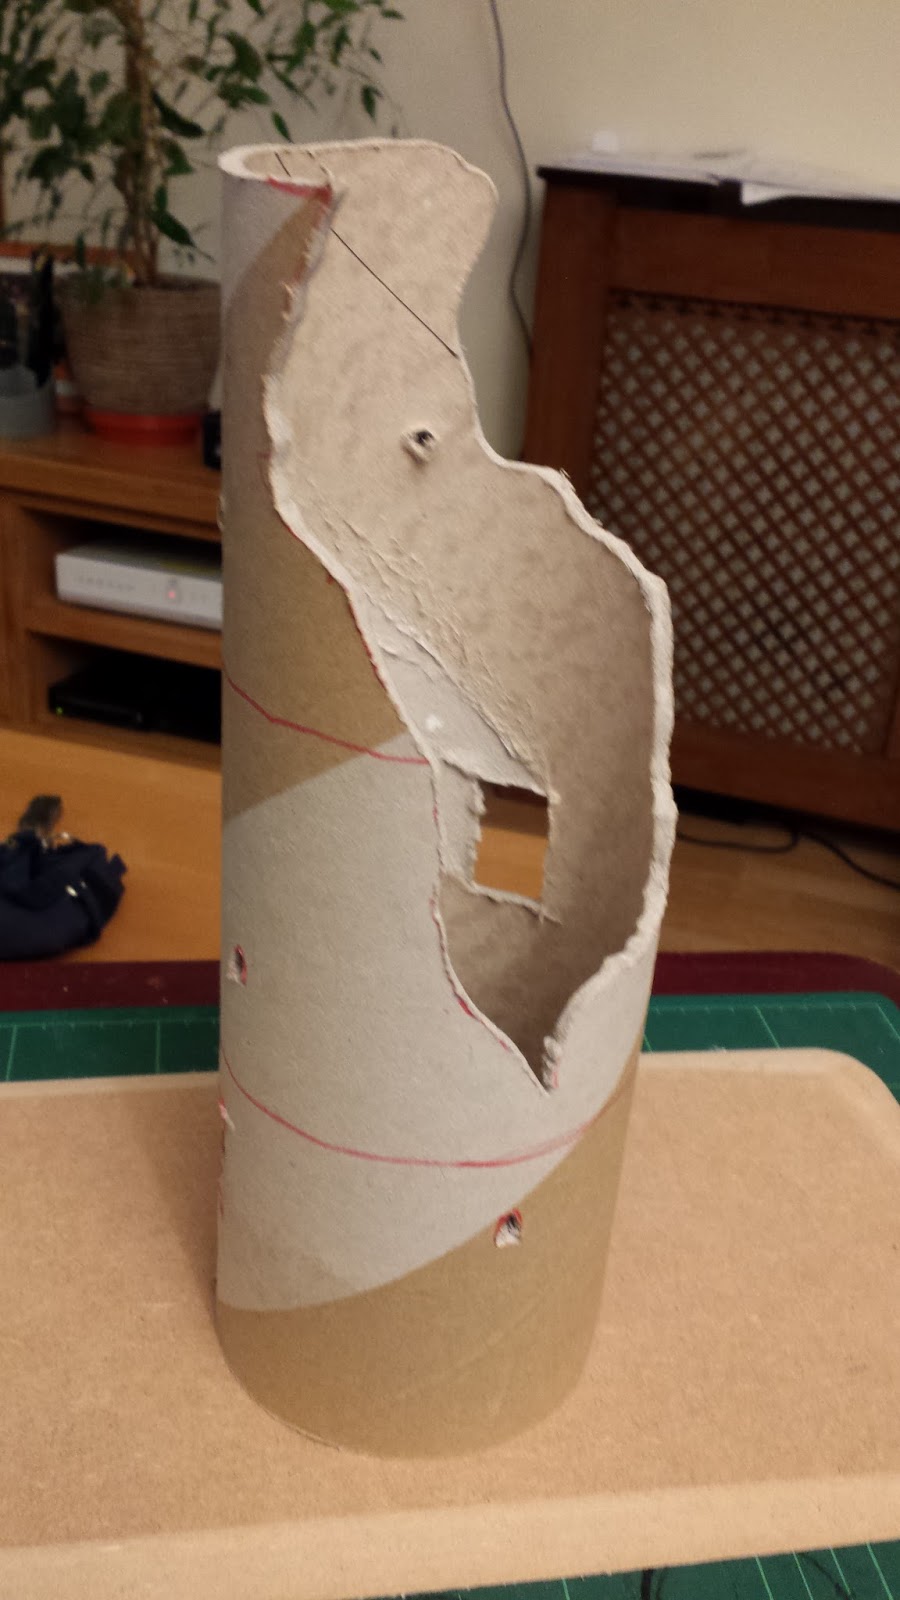
I took a length of heavy duty cardboard tube and marked it out where I needed to cut it!

The tube is 4 or 5mm thick, so to tough to cut with a knife. I decided that for speed I would use my Jigsaw. This is a bit dangerous as trying to cut a curved tube can be tricky, I have 30+ years experience as a professional model maker, but for anyone not used to using these saws I would recommend a fair bit of caution when trying to cut tube like this! I also used a 6mm drill to drill some holes that I will shape into windows.


I plan to use Foamcore board for most of the construction work in this series of builds. Foamcore, as the name suggests, is a sandwich of foam with a layer of thin card on both sides. It cuts easily and accurately, and the thickness (I have both 5mm and 3mm sheets) is great for representing ruined walls.

First up I have cut three discs that will be used for the floors of the tower. I simply placed the tube over the foamcore and drew around the inside of it. I am not aiming for perfection with the cutting of the pieces as the ruins will be covered in rubble and this can be used to hide any imperfections...


I cut sections out of the discs to show where the side of the tower had collapsed. Then glued them into the tube.


Next I stated work on the ground floor of the two houses either side of the tower. To hide the edges of the foamcore I cut away the inner side of one edge, removing the inner card and the foam. This leaves a strip of card which can be stuck over the edge of the wall that is glued to it.


I glued the two ground floor buildings on either end. One I had cut open as a ruin but the other I had left intact. I also cut some rectangles of foamcore to build up a staircase to the towers entrance which was raised above the ground.


I decided that both outer building should have open damaged walls on the ground floor, so I used a sharp scalpel to cut the intact one open too. I then repeated the process of building the four walls, to add the first floor on to them. I also cut a rectangle of foamcore for the floor of each house.


I cut windows into the walls of the buildings and also a doorway on one of the first floor walls where it will lead to a bridge into the tower.


It all looks fairly crude at the moment, but as these are all going to be ruins anyway I didn't feel it was necessary to spend to much time making it all neat! Next up I will move of to adding some balsawood and spuce strips to give the buildings some detail and character!
Related Posts Plugin for WordPress, Blogger...